Posts
Posts


Showing posts with label tuesday tutorial. Show all posts
Showing posts with label tuesday tutorial. Show all posts
Tuesday, January 26, 2010
Tuesday Tutorial - T-Shirt Scarves
This week's tutorial comes to us from ThreadBanger.com, in which special guest Megan Nicolay, from Generation-T, demonstrates three ways to turn an old T-shirt into a stylish winter scarf with minimal or no sewing required.
Have a favorite online tutorial you'd like to share? Post the link in a comment and it could appear in a future ETC Tuesday Tutorial!

Tuesday, December 15, 2009
Tuesday Tutorial - Fused Plastic...with a Twist!
If you've been around Etsy very long, you've seen many items made from fused plastic bags, and possibly even seen this tutorial or this one on how to fuse plastic bags. We even featured a Fusion Bag tutorial on this blog not that long ago.
As you may have guessed, I am quite fascinated with fused plastic bags, but have never quite had the nerve to try it myself. WELL, I finally found a project that may help me overcome my fear!
 How cool is this ornament?!?!?
Julie Finn of Crafting a Green World posted this tutorial for making ornaments using zip-top sandwich bags and some pretties, such as tissue paper left over from previous presents, glitter, very small bits of broken crayons, and very small scraps of fabric or felted wool. A little bit of melting magic, some cookie cutters for patterns, and you have some very easy, very inexpensive ornaments that look like they'd simply be a blast to make!
As you may have guessed, I am quite fascinated with fused plastic bags, but have never quite had the nerve to try it myself. WELL, I finally found a project that may help me overcome my fear!
 How cool is this ornament?!?!?
Julie Finn of Crafting a Green World posted this tutorial for making ornaments using zip-top sandwich bags and some pretties, such as tissue paper left over from previous presents, glitter, very small bits of broken crayons, and very small scraps of fabric or felted wool. A little bit of melting magic, some cookie cutters for patterns, and you have some very easy, very inexpensive ornaments that look like they'd simply be a blast to make!
Thursday, December 10, 2009
Tuesday Tutorial on Thursday....
Sorry about not having Tuesday's Tutorial up on time.....my family had a medical emergency and spent a couple days at the hospital. All is well now. Thanks to those who knew what was happening when it was happening and was praying for us -- those prayers were greatly appreciated!
I have a great Tutorial picked out for you today, another one to help you decorate for the holidays...a Ruffly Felt Wreath!

This project was designed by Kristen at Domestifluff, who was influenced by the Pillow With Rosette Clusters From Felt Furnishings article from The Storque - "Etsy's handmade blog". And Kristen says that if you use the How to Cut Felt Circles tutorial by Maya*Made, you should be able to cut the time working on this wreath in half....at least! Once all the circles are cut, the rest of it is a breeze. And YES, it can be worked in a variety of colors to suit the season, holiday, or your decor. Enjoy!!!
I have a great Tutorial picked out for you today, another one to help you decorate for the holidays...a Ruffly Felt Wreath!
This project was designed by Kristen at Domestifluff, who was influenced by the Pillow With Rosette Clusters From Felt Furnishings article from The Storque - "Etsy's handmade blog". And Kristen says that if you use the How to Cut Felt Circles tutorial by Maya*Made, you should be able to cut the time working on this wreath in half....at least! Once all the circles are cut, the rest of it is a breeze. And YES, it can be worked in a variety of colors to suit the season, holiday, or your decor. Enjoy!!!
Tuesday, November 24, 2009
Tuesday Tutorial - Recycled Dimples Ornament

Why did I choose this tutorial to share with you, you may be asking? Several reasons, actually. First and foremost, I LOVE the name! Second, I also LOVE Christmas ornaments! And finally, well, Angie Hall Haviland is one of our many talented members and expert tutorial-writers!!!
Now, take a good look at the photo of this project.....can you tell what the base of this ornament is? Do you know what a "dimple" is? I'll give you one hint...NO, it's not a lid! Give up???? Click HERE to find out and to read Angie's tutorial for these wonderfully creative ornaments. Be sure to add this one to your favorites, 'cuz you're gonna want to make a boat-load of these.....I know I do!!!
Thanks for tutorial, Angie!
Tuesday, November 10, 2009
Tuesday Tutorial & More

Today's tutorial is an upcycling project. What is upcycling, you ask? Upcycling simply means taking something that would normally be thrown away and creating something new with it. In this case, we are upcycling those plastic bags that we've all got an over-abundance of into really cool and re-usable tote bags. This particular tutorial is basically 3 tutorials in one:
1. fusing plastic bags
2. Making box corners
3. Making a fusion bag
The fusing tutorial is courtesy of Etsy Labs, and the other two are courtesy of Sew Take A Hike. When you have time, wander around both of these sites for even more wonderful tutorials!
Also, if you have not already done so, please stop by our What's New with ETC? thread to meet our newest members and check out our latest creations.
Lastly, since this month has 5 Mondays, we will be holding our $5 Monday event again this month. And yes, it falls on Cyber Monday, so don't forget to spend some of your holiday shopping time with us that day, taking advantage of our $5 listings!
Tuesday, October 27, 2009
Tuesday Tutorial - Pretty Little Flowers for Your Hair
Connie, of ReFabulous, is sharing another wonderful tutorial with us, this time for pretty little fabric flowers for your hair! The original tutorial appeared on her blog...

We recently spent an afternoon crafting some lovely hair bobbies. These are so simple to make! The flowers can be used in many different ways, as well -- hair clips, brooches, pins, embellishments. . . .
We used reclaimed dress linings to make these -- I had plenty left over from my deconstruction for sachets, and I never knew what to do with this type of fabric before. It's a synthetic fabric, a silky polyester.
(CAUTION: please use extreme caution when using this tutorial, as a flame is used in this process. Do NOT allow children or pets near the flame, and do not allow children to play with the flame, burn themselves or anyone/anything else. I am not responsible for any accidents or injuries resulting from this free tutorial.)
To make these little hair bobbies (or clips, brooches, pins, etc.), you will need:
* synthetic fabric, such as polyester
* scissors
* candle and matches/lighter
* glass jar, filled with water
* clothes pin
* a piece of foil
* needle
* thread
* beads, buttons or other embellishments
* hair bobby, clip, pin blank, etc.
* strong adhesive, such as E6000

1. Cut out circles (or whatever shape you like) from the polyester that are slightly larger than your desired finished flower size. We used concentric circles for ours for a fuller, layered look. Be sure to cut a few extra, to allow for experimenting and mess-ups.

2. Light your candle, and place on a sturdy surface, away from flammables, pets and children. Place your jar of water within reach.
3. Using a clothes pin, hold one fabric circle over -- not in -- the flame of the candle.

You'll want to experiment with a few extra circles, as different fabrics will act uniquely when held near the flame. Some will curl in one direction, some turn colors, some crinkle. Holding them closer to the flame or longer will also achieve different results. Once you've achieved the look you want, set the circle aside on the foil to cool.
4. Repeat on all the fabric circles. Extinguish your candle when you are finished.

5. EXTREMELY IMPORTANT: If you hold the fabric circle still for too long, or too close to the flame, it will scorch and/or catch on fire. If this happens, quickly and carefully place the burning fabric in the jar of water to extinguish the flame. Be very vigilant -- as some fabrics tend to ignite quicker than others!
6. Next, arrange and stack your fabric circles (petals) into flowers.

7. Using your needle and thread, sew a few stitches through all the layers of petals -- just a little "X" will do -- fastening all the petals together. Tie off thread in the back of the flower.

8. Now, attach your flower center. If you are using beads or buttons, stitch them in place, tying off the thread in the back of the flower. If you are using other embellishments, a strong adhesive (such as E6000) may be used to attach them to the flower.

9. Finally, attach your flower to a hair bobby, clip or pin back using your strong adhesive.

10. Set aside on the foil, and allow it to dry thoroughly, according to your adhesive's recommendation.

And that's it! So simple, and so pretty. The possibilities are endless -- imagine these flowers layered with ribbon, mesh, tulle, organza. . . or topped with an antique brooch or cameo! These would make sweet little gifts for teachers, co-workers and friends, or even lovely stocking stuffers. Have fun!

For lots more photos and a video illustrating how quickly these fabrics change and curl, please check out Connie's full tutorial on her blog.
Thanks again, Connie, for sharing another awesome project with us!
Thanks again, Connie, for sharing another awesome project with us!
Tuesday, October 20, 2009
Tuesday Tutorial - Pretty Little Gift Pouch
Angie, of AngieHallHaviland, has graciously allowed me to share her Pretty Little Gift Pouch tutorial with you. This wonderful tutorial was originally published on Paper Imagery Designs blog...

I saw an ad recently on a magazine for a new green magazine and there was a toilet tissue roll made into a gift pouch. I really really love to recycle, reuse, and repurpose everything I can. I wanted my Toilet tissue roll gift pouch to be reusable...what good is recycling if the person you give it to throws it right in the trash?? and of course I wanted it to be pretty :O)
The possibilities are endless for these Pretty Little Gift Pouches....For mine I used scraps and had a blast making it. They are a wonderful size...they will hold a necklace, charms, little goodies, a gift card or something everyone loves $. I'm thinking come Christmas time...add a ribbon for hanging and put them on the tree :)
So you will need.....
Toilet Tissue Roll
Paper and/or trim scraps
glue
hole punch
ribbon
misc. items (I even used a candy wrapper from my current favorite chocolates)
Image from Paper Imagery Designs
acrylic paint

I painted my tissue roll with an off white acrylic paint and let it dry. Then flattened my tissue roll and glued the bottom closed (put close pins on it to hold it closed while drying). I then glued on papers, pieces of foil candy wrapper, and this sweet little PID image....added a scrap of lace and a flower and button center. Then I punched holes in the top. I added the surprise gift to the inside and then strung a length of ribbon into the holes and tied a bow. That's it. FUN!!

Thanks again, Angie, for allowing me to re-post your tutorial!!!
Have a tutorial you'd like to recommend for our blog? E-mail the information (and link) to us at etsytx@gmail.com and you just might see it here!
Monday, June 15, 2009
Tutorial Tuesday
While this isn't a crafting tutorial, it has great info on how to add Google Analytics tracking to our blogs. Don't be intimidated~ If I can do it, anyone can~
Google Analytics is a useful tool for tracking what goes on in our Etsy shops. After I started a blog on blogspot earlier this year, I decided it would be good to have GA tracking my visits. I wondered how difficult it would be since Etsy does a great job of making it easy to set up GA on our shops. Everything seemed fairly straight forward until it came time to post the GA code into my blog. GA tells you to “Copy the following code block into every webpage you want to track immediately before the tag.” How do I find the tag on my blog? I hadn’t seen that tag on my blog when I was setting it up. The hunt was on. My first try at accomplishing this was to paste the code that GA provided into an html widget at the bottom of the page and hope that would wind up where it was supposed to be. No luck.
I was not the only one that this sounded reasonable to, because Kelley with Tattered Tapestry tried that too in her attempt to install GA for her blog. I knew to tell her that wouldn’t work but I’d have to look to see where I had pasted the code to finally get GA to work with my blog. There were two places that I needed to look. I found GA code in the first one, so I told her to put the code there. Unfortunately, what I didn’t realize was that the second place that I was going to look actually placed it in that first place.
To make a long story short, I did something stupid at about this time and lost my GA code on my blog! So I thought, no problem, I’ll just reinstall it. Once I finally retraced my steps, I was able to tell Kelley where to correctly add the code. It worked! Both of our blogs are now being tracked by GA. As a help to anyone else out there that wants to add GA to their blog, I am providing a step by step list of what to do to add it. (I’m sure it works the same way for other blogs, you just need to find out how to access your blog’s html code for it.)
Ok, so are you ready? Following is the list of steps and tips that I wrote down when I reinstalled GA on my blog. If you are not already using GA on your blog they should work for you too.
1) Sign in to or sign up for a Google Analytics account.
2) (You should now be on a page that looks like the first screen shot.) Click on “Add new profile” in the dark gray bar near the top of the page. (circled in red in the screen shot)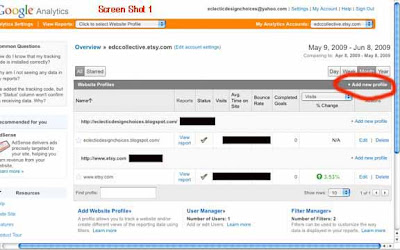
3) On the page that comes up, click the “Add a Profile for a new domain” button, fill in your blog’s URL (without the http://), choose from the pull down menus, the two time zone related entries requested. Click the “Finish” button.
4) This will bring you to a page that says on it “tracking not installed”. It will also include a box of code for you to add to your blog, with the instructions to “Copy the following code block into every webpage you want to track immediately before the tag.” Copy the code provided before leaving this page.
5) In a new tab, go to http://www.blogger.com/ and sign in.
6) This should bring up your blogger dashboard. Click on “Layout”.
7) Click on “Edit HTML” as shown in the second screen shot.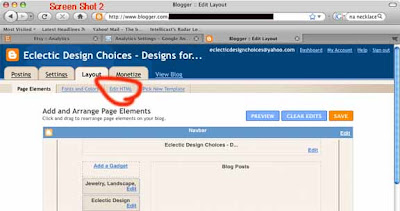
9) Click “Save Template”
10) Go back to the tab that has the GA page with the code that you copied. Click finish at the bottom of the page. (This will take you back to the page in the first screen shot.)
11) You will probably see a caution sign under status for your new blog tracking profile. To check if tracking has been installed properly, click the “edit” button on the same line and to the right of the caution sign.
12) This will bring up a page like the third screen shot. If the code was installed correctly, the area circled in red will have a check mark and say “receiving data”. If not, there will be a yellow circle with an exclamation point and it will say “tracking not installed”.
Hopefully, if you followed these instructions, you are receiving data and within 24 hours your caution sign should turn into a green check and you will be able to view all of the great GA information for your blog. Good luck. (Article written by Cathy of EDCCollective and edited by Kelley of Tattered Tapestry.)
Google Analytics is a useful tool for tracking what goes on in our Etsy shops. After I started a blog on blogspot earlier this year, I decided it would be good to have GA tracking my visits. I wondered how difficult it would be since Etsy does a great job of making it easy to set up GA on our shops. Everything seemed fairly straight forward until it came time to post the GA code into my blog. GA tells you to “Copy the following code block into every webpage you want to track immediately before the tag.” How do I find the tag on my blog? I hadn’t seen that tag on my blog when I was setting it up. The hunt was on. My first try at accomplishing this was to paste the code that GA provided into an html widget at the bottom of the page and hope that would wind up where it was supposed to be. No luck.
I was not the only one that this sounded reasonable to, because Kelley with Tattered Tapestry tried that too in her attempt to install GA for her blog. I knew to tell her that wouldn’t work but I’d have to look to see where I had pasted the code to finally get GA to work with my blog. There were two places that I needed to look. I found GA code in the first one, so I told her to put the code there. Unfortunately, what I didn’t realize was that the second place that I was going to look actually placed it in that first place.
To make a long story short, I did something stupid at about this time and lost my GA code on my blog! So I thought, no problem, I’ll just reinstall it. Once I finally retraced my steps, I was able to tell Kelley where to correctly add the code. It worked! Both of our blogs are now being tracked by GA. As a help to anyone else out there that wants to add GA to their blog, I am providing a step by step list of what to do to add it. (I’m sure it works the same way for other blogs, you just need to find out how to access your blog’s html code for it.)
Ok, so are you ready? Following is the list of steps and tips that I wrote down when I reinstalled GA on my blog. If you are not already using GA on your blog they should work for you too.
1) Sign in to or sign up for a Google Analytics account.
2) (You should now be on a page that looks like the first screen shot.) Click on “Add new profile” in the dark gray bar near the top of the page. (circled in red in the screen shot)
3) On the page that comes up, click the “Add a Profile for a new domain” button, fill in your blog’s URL (without the http://), choose from the pull down menus, the two time zone related entries requested. Click the “Finish” button.
4) This will bring you to a page that says on it “tracking not installed”. It will also include a box of code for you to add to your blog, with the instructions to “Copy the following code block into every webpage you want to track immediately before the tag.” Copy the code provided before leaving this page.
5) In a new tab, go to http://www.blogger.com/ and sign in.
6) This should bring up your blogger dashboard. Click on “Layout”.
7) Click on “Edit HTML” as shown in the second screen shot.
8) This brings up a box with HTML code in it. Scroll down to the bottom of the code. The next to the last line should be your "/body" tag. Insert a blank line by using “return” on your keyboard just above the tag and then paste the code that you copied from GA on the blank line. You will see other codes that are similar to "/body" (such as "body"). It has to exactly match "/body" and the only place this occurs is at the very bottom.
9) Click “Save Template”
10) Go back to the tab that has the GA page with the code that you copied. Click finish at the bottom of the page. (This will take you back to the page in the first screen shot.)
11) You will probably see a caution sign under status for your new blog tracking profile. To check if tracking has been installed properly, click the “edit” button on the same line and to the right of the caution sign.
12) This will bring up a page like the third screen shot. If the code was installed correctly, the area circled in red will have a check mark and say “receiving data”. If not, there will be a yellow circle with an exclamation point and it will say “tracking not installed”.
Hopefully, if you followed these instructions, you are receiving data and within 24 hours your caution sign should turn into a green check and you will be able to view all of the great GA information for your blog. Good luck. (Article written by Cathy of EDCCollective and edited by Kelley of Tattered Tapestry.)
Monday, June 8, 2009
Tuesday's Tutorial - Paper Flower Bouquet
 Ann, of DuctapeandDenim.etsy.com, has graciously allowed me to share with you her Paper Flower Tutorial. These gorgeous flowers can be made out of various papers and colors to match seasons. This one is for fall colors, but can be adapted to fit any season.
 Jordi got in the mood to make our paper flowers again a few days ago so we made ourselves a bouquet and put a kit in our Etsy store, too. These are really easy & quick to make. And you can make them in whatever colors you want. I always like to include some of my old paper in them and ink the edges but you wouldn't have to do that.

Here's how to do it:
Punch several circles for each flower. I used 5 different punches ranging from 3" to 1". Some scalloped, some not. If you don't have punches you can cut them out, or even tear them. It just takes longer.
Punch several circles for each flower. I used 5 different punches ranging from 3" to 1". Some scalloped, some not. If you don't have punches you can cut them out, or even tear them. It just takes longer.

Wad up the papers. This is the fun part! Make them as wrinkled as you want -- or don't even wad them if you want a cleaner look.
Here's the stack of circles ready to assemble. You can glue them together and then glue a button on top or use a brad. Today I decided to use up some of the brads in my desk. I inked my craft stick (Jo just bought ANOTHER box of 1000 so we have to make LOTS of these now!!!) and glued some leaf punches on, too. Although when you put them in a display like I show above you can't really see the leaves. For the bouquet in the first photo I stuck an old piece of styrofoam in a clean veggie can, stuck my flowers in, and covered the styrofoam with shredded papers. Then I took 2 strips of coordinating papers and taped them on and tied a piece of jute around the whole thing. It probably took me 20 minutes to do the whole bouquet. You've probably seen these on my blog before. We've made bouquets for Valentine's Day, July 4th, and Christmas.
I think I'm going to make some flowers and glue magnets on the back for my fridge. I need new magnets. :-)

Check out her blog to see the full tutorial. Thanks Ann for sharing this fun and creative project!
Thursday, June 4, 2009
A Marketing Study

As shop owners we are all working to promote our shops. Most of us are more knowledgeable about our craft than we are marketing and advertising. All assistance we receive and advice we can get we devour. (I know I do)
Cheri, from ItsMeCheri.etsy.com, did a marketing experiment and posted the results on her blog. I have copied an excerpt from her blog for a tease:
"I decided to do an experiment. I decided to purchase an Etsy Showcase. I heard pros and cons to the Showcases. The biggest con being why market to fellow Etsy-ians? The pros--exposure!
So after reading the how to's, I committed to buy. Which Showcase to join? I choose the Ceramic & Pottery Showcase as I am known as a Polymer Clay Artist who also has expertise in Jewelry Making, Excellent Quality, and Superior Customer Service.
Now......to the choice of the Day to have my Showcase. I looked at all the options. I figured that it would be best to have the Showcase on a Saturday--most people were home and would be on the computer. Also, I would choose a day that had the least amount of spots open as that would be indicative of a good day -- it must be good day 'cause more people chose that day for their Showcase.
After seeing my results, I realized that my thought processes were wrong and the results were disappointing:"
She has some very interesting results. Go here for the results of her comparisons. It is helpful to us all.
Cheri, from ItsMeCheri.etsy.com, did a marketing experiment and posted the results on her blog. I have copied an excerpt from her blog for a tease:
"I decided to do an experiment. I decided to purchase an Etsy Showcase. I heard pros and cons to the Showcases. The biggest con being why market to fellow Etsy-ians? The pros--exposure!
So after reading the how to's, I committed to buy. Which Showcase to join? I choose the Ceramic & Pottery Showcase as I am known as a Polymer Clay Artist who also has expertise in Jewelry Making, Excellent Quality, and Superior Customer Service.
Now......to the choice of the Day to have my Showcase. I looked at all the options. I figured that it would be best to have the Showcase on a Saturday--most people were home and would be on the computer. Also, I would choose a day that had the least amount of spots open as that would be indicative of a good day -- it must be good day 'cause more people chose that day for their Showcase.
After seeing my results, I realized that my thought processes were wrong and the results were disappointing:"
She has some very interesting results. Go here for the results of her comparisons. It is helpful to us all.
Tuesday, June 2, 2009
Tuesday's Tutorial

Connie, from Refabulous.etsy.com has a wonderful blog and has graciously agreed to share one of her tutorials with us.
I mentioned a few posts back about a new item I've listed in my shop, and I'd love to share my pattern with you!
I made these sweet little mice from reclaimed fabric scraps, some rescued embroidery floss, cotton cord, catnip and polyfil.
You can download the pattern for these cute little catnip mice here (free and safe.) Or, just transpose it from the 1-inch grid below:
 Details for how to sew these wonderful Mice can be found here. Oh, I almost forgot -- please feel free to make these mice for yourself, your friends, your kitties, and even to sell in your shops. Just please don't sell my pattern -- that wouldn't be very cool.
Monday, May 18, 2009
Paper Box Tutorial
This is a video of Mary, from Etsy admin. teaching how to make a great box!
I learned to make these boxes and now send all my items to my customers in lovely boxes. You can get great deals on scrapbook paper if you watch for coupons and sales.
Tip No. 1: Don't use Tag Paper. They are pretty, but they are so thick the creases crack.
Tip No. 2: Skip step one (fold corner to corner to find center) Use a ruler and pencil to draw lines corner to corner on the inside to find the center. This will give you a lovely flat top with no creases.
Good luck and have fun. Customer's love these!
Subscribe to:
Posts (Atom)