


Google Analytics is a useful tool for tracking what goes on in our Etsy shops. After I started a blog on blogspot earlier this year, I decided it would be good to have GA tracking my visits. I wondered how difficult it would be since Etsy does a great job of making it easy to set up GA on our shops. Everything seemed fairly straight forward until it came time to post the GA code into my blog. GA tells you to “Copy the following code block into every webpage you want to track immediately before the tag.” How do I find the tag on my blog? I hadn’t seen that tag on my blog when I was setting it up. The hunt was on. My first try at accomplishing this was to paste the code that GA provided into an html widget at the bottom of the page and hope that would wind up where it was supposed to be. No luck.
I was not the only one that this sounded reasonable to, because Kelley with Tattered Tapestry tried that too in her attempt to install GA for her blog. I knew to tell her that wouldn’t work but I’d have to look to see where I had pasted the code to finally get GA to work with my blog. There were two places that I needed to look. I found GA code in the first one, so I told her to put the code there. Unfortunately, what I didn’t realize was that the second place that I was going to look actually placed it in that first place.
To make a long story short, I did something stupid at about this time and lost my GA code on my blog! So I thought, no problem, I’ll just reinstall it. Once I finally retraced my steps, I was able to tell Kelley where to correctly add the code. It worked! Both of our blogs are now being tracked by GA. As a help to anyone else out there that wants to add GA to their blog, I am providing a step by step list of what to do to add it. (I’m sure it works the same way for other blogs, you just need to find out how to access your blog’s html code for it.)
Ok, so are you ready? Following is the list of steps and tips that I wrote down when I reinstalled GA on my blog. If you are not already using GA on your blog they should work for you too.
1) Sign in to or sign up for a Google Analytics account.
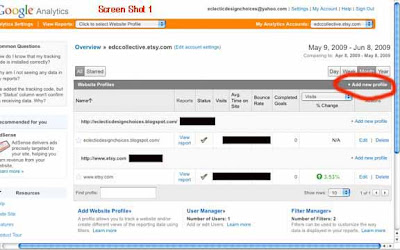
2) (You should now be on a page that looks like the first screen shot.) Click on “Add new profile” in the dark gray bar near the top of the page. (circled in red in the screen shot)
3) On the page that comes up, click the “Add a Profile for a new domain” button, fill in your blog’s URL (without the http://), choose from the pull down menus, the two time zone related entries requested. Click the “Finish” button.
4) This will bring you to a page that says on it “tracking not installed”. It will also include a box of code for you to add to your blog, with the instructions to “Copy the following code block into every webpage you want to track immediately before the tag.” Copy the code provided before leaving this page.
5) In a new tab, go to http://www.blogger.com/ and sign in.
6) This should bring up your blogger dashboard. Click on “Layout”.
7) Click on “Edit HTML” as shown in the second screen shot.
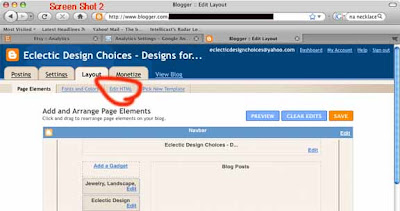
8) This brings up a box with HTML code in it. Scroll down to the bottom of the code. The next to the last line should be your "/body" tag. Insert a blank line by using “return” on your keyboard just above the tag and then paste the code that you copied from GA on the blank line. You will see other codes that are similar to "/body" (such as "body"). It has to exactly match "/body" and the only place this occurs is at the very bottom.
9) Click “Save Template”
10) Go back to the tab that has the GA page with the code that you copied. Click finish at the bottom of the page. (This will take you back to the page in the first screen shot.)
11) You will probably see a caution sign under status for your new blog tracking profile. To check if tracking has been installed properly, click the “edit” button on the same line and to the right of the caution sign.
12) This will bring up a page like the third screen shot. If the code was installed correctly, the area circled in red will have a check mark and say “receiving data”. If not, there will be a yellow circle with an exclamation point and it will say “tracking not installed”.
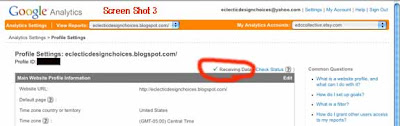
Hopefully, if you followed these instructions, you are receiving data and within 24 hours your caution sign should turn into a green check and you will be able to view all of the great GA information for your blog. Good luck. (Article written by Cathy of EDCCollective and edited by Kelley of Tattered Tapestry.)


2 comments:
thank you for the clear info. if only it was like that in google land. now can you help me set up a blog??
xxoo
kimmy
I use Google Analytics on both my blog and my etsy account. It is very interesting, to say the least. I find it very entertaining to read the keywords that lead people to my blog...
Post a Comment